
DOCUMENTATION
First National Bank
First National Bank Integration
Key Features
Bank Statement Import
Functionality:
File based import of bank statements in the required formats.
Supports both standard and short formats for ABSA and Standard Bank.
Setup:
On Bank Account Card page, select the Bank Statement Import Format that relates to your bank account.
Payment Export
Functionality:
Exports payment journal data in bank-specific formats.
Setup:
On Bank Account Card page, select the Payment Export Format that relates to your bank account.
API Integration for FNB Direct Debit Management
Automates the creation, processing, and status updates of direct debit collections.
Supports SEPA-compliant direct debit mandates.
Only supports direct debit instructions for South African Banks in South African Rand.
Account Verification Service
Verifies customer and vendor bank account details through FNB.
Retrieves results in the background and evaluates them against configurable acceptance criteria.
Bank Activation
Open the Bank Integration Setup page in Business Central.
You need to obtain a
Client ID
and
Client Secret
from the bank to use the integration. Contact your company’s bank account manager to obtain these setups and enable your account for the integration. They will also be able to provide you with Sandbox setups if you want to try it out first.
Confirm ZAR Currency
, when the GL Setup LCY Code is
not
set to the ISO Code “ZAR”, confirmation is required that the local currency is ZAR, which is required for the integration.
If
Production Active
=
No
, it will target the bank’s sandbox environment. With Production Active = Yes, it will target bank production environment.

NOTE: You will not be able to enable it as Production Active in a Sandbox environment.
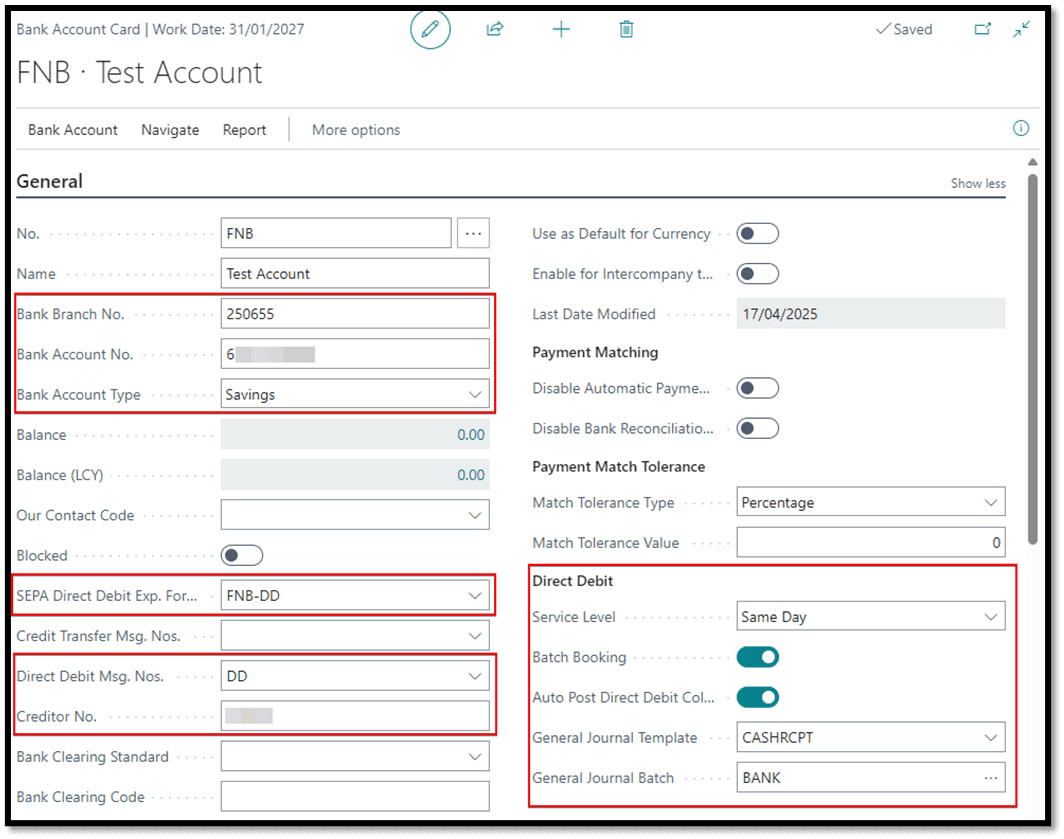
Bank Account
Field | Value | Description |
|---|---|---|
Bank Branch No. | Required | |
Bank Account No. | Required | |
Bank Account Type | Required | |
SEPA Direct Debit Exp. Format | FNB-DD | During Direct Debit Export, this lets the system know which format to use. The Bank Integration app will then check if the selected bank account on the Direct Debit Collection has a Bank Export Format linked and confirm if it is relevant to a specific bank. Each export and their associated checks are therefore only done if appropriate. |
Direct Debit Msg. Nos. | Required | |
Creditor No. | This is the company abbreviation used in the export. | |
Service Level | Required | |
Batch Booking | If Yes, Transactions will be posted to the creditor account in a consolidated manner. A single transaction entry will be posted to the creditor account, for the full value of all transactions. Any transactions that fail will result in a reversal entry being posted on the creditor account. Else, the transactions will be posted to the creditor account in an itemised manner. An entry will be posted into the creditor account for each successful transaction. | |
Auto Post Direct Debit Collection | Automatically post the Direct Debit Collection once collections report has been received from the bank and there are no more pending entries. | |
General Journal Template | The template to use when automatically posting the direct debit collection. | |
General Journal Batch | The batch to use when automatically posting the direct debit collection. |
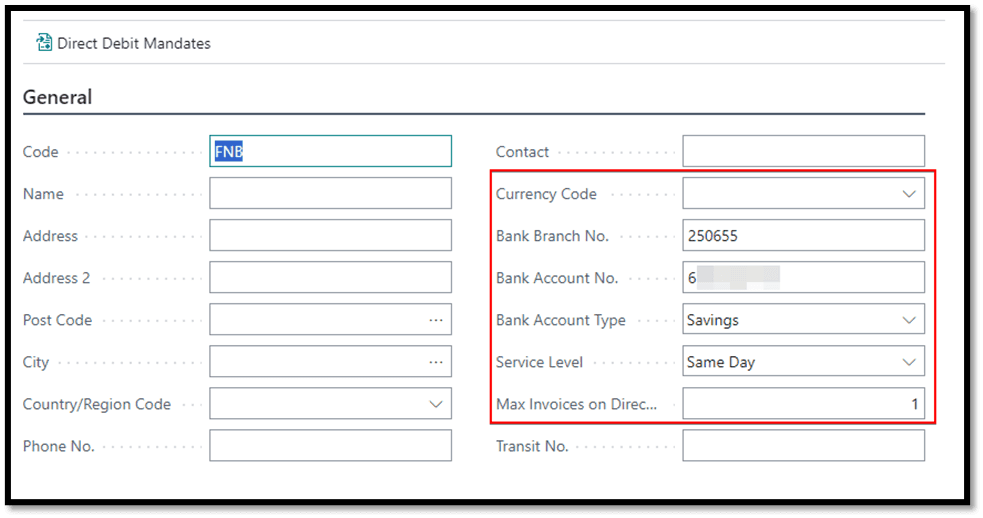
Customer Bank Account
Field | Value | Description |
|---|---|---|
Bank Branch No. | Required | |
Bank Account No. | Required | |
Bank Account Type | Required | |
Service Level | Required | |
Max Invoices on Direct Debit | Indicates the maximum number of invoices that can be loaded on a Direct Debit Collection. | |
SWIFT Code | Required |
NOTE:
SEPA Direct Debit Mandates
: No changes have been made to this table, just know that an active mandate is required for this > functionality to work.
Account Verification Service (AVS)
The Account Verification Service submits customer or vendor bank account details to FNB and retrieves the verification result in the background. The latest result is shown on the bank account card, and all requests remain available on the Account Verification Requests page.
Prerequisites
Before using AVS:
Ensure that the Business Central job queue is operational. Each AVS request automatically creates a job queue entry to retrieve its result.
Configure a Business Central email account for the AVS email scenario if users must receive result notifications.
Give users the BASIC-BANK BTR and AVS-EDIT BTR permission sets, or the ALL-BANK BTR permission set.
Configure the Acceptance Criteria
Search for and open
Bank Integration Setup
.
In the
FNB Integration
section, set
AVS Response Delay (Seconds)
. The minimum and default value is 120 seconds.
In
Account Verification Acceptance Criteria
, enable every result that FNB must return as
Yes
before the bank account is considered verified.
Enable at least one acceptance criterion. If no criteria are enabled,
AVS Verified
remains disabled even after a completed request.
All enabled criteria must be returned as
Yes
for
AVS Verified
to be enabled. The customer and vendor settings for credits and debits are evaluated according to the type of bank account being verified.
Acceptance criterion | Applies to |
|---|---|
Identification Type Verified | Customer and vendor bank accounts |
Surname/Company Name Verified | Customer and vendor bank accounts |
Email Address Verified | Customer and vendor bank accounts |
Mobile Number Verified | Customer and vendor bank accounts |
Initials Verified | Customer and vendor bank accounts |
Account Open | Customer and vendor bank accounts |
Credits Allowed for Customer | Customer bank accounts only |
Debits Allowed for Customer | Customer bank accounts only |
Credits Allowed for Vendor | Vendor bank accounts only |
Debits Allowed for Vendor | Vendor bank accounts only |
Account Open Three Months | Customer and vendor bank accounts |

AVS Email Setup
When an Account Verification Service (AVS) response is received, Business Central queues a notification email for the user who submitted the verification request. Configure both the sender account and the requesting user’s recipient address.
Configure the Sender Account
Search for and open
Email Accounts
.
Select
New
, choose the email account type, and complete the assisted setup.
Send a test email to confirm that the account can send messages.
Assign the
AVS Scenario
email scenario to the account.
The account assigned to
AVS Scenario
is used as the sender for AVS result notifications.

Configure the Recipient Address
The notification is sent to the user who selected
Verify Account
. Business Central uses the first populated address in this order:
Contact Email
on the User Card.
Authentication Email
on the User Card.
E-Mail
on the User Setup page.
Ensure that at least one of these fields contains a valid email address for every user who submits AVS requests. If all three fields are blank, no notification is sent, but the result remains available on the bank account card and the
Account Verification Requests
page.
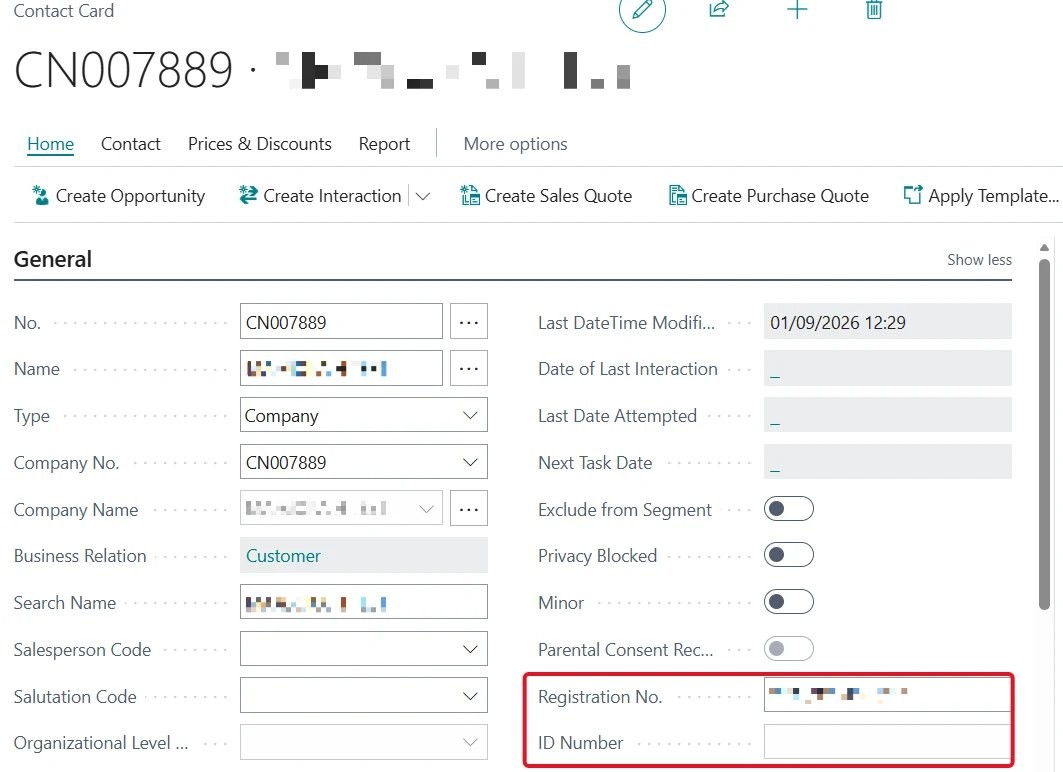
Prepare the Account Holder Contact
AVS uses a contact linked to the customer or vendor as the account holder. Create or update the contact before submitting a verification request.
Confirm that the contact is related to the customer or vendor through a Contact Business Relation.
Enter the contact
Name
.
For a person contact, enter the
ID Number
on the Contact Card.
For a company contact, enter the
Registration Number
.
Enter the email address, mobile number, and initials when those details must be included in the verification or are enabled as acceptance criteria.
The
Account Holder Contact
lookup only allows contacts related to the bank account’s customer or vendor.
Prepare the Bank Account
On the Customer Bank Account Card or Vendor Bank Account Card, complete these required fields:
Field | Description |
|---|---|
Bank Account No. | Account number submitted to FNB |
Bank Branch No. | Branch identifier submitted to FNB |
Bank Account Type | Account type submitted to FNB |
Account Holder Contact | Related contact whose identity and contact details are submitted |

Verify an Account
Open the relevant Customer Bank Account Card or Vendor Bank Account Card.
Select
Verify Account
from the Processing actions.
Confirm that Business Central reports that the request was submitted.
Review the
Latest Account Verification
FactBox. The request initially has a status of
Submitted
.
Wait for the scheduled job queue entry to retrieve the FNB report. The request changes to
Completed
when a report is processed or
Failed
when retrieval is unsuccessful.
The requesting user will receive an email when the verification request is completed.
Check
AVS Verified
on the bank account card. It is enabled only when the request is completed and every configured acceptance criterion has a result of
Yes
.
Submitting another verification creates a new request. The FactBox shows the latest request while earlier requests remain in the request history.


Review Verification Results
The
Latest Account Verification
FactBox shows the request dates, request status, and each verification result. Select
Detail
to open the current request, or search for
Account Verification Requests
to review the complete history. The verification values are:
Value | Meaning |
|---|---|
Yes | FNB verified the value |
No | FNB did not verify the value |
Unverified | The value was not verified |
Late Response | FNB returned a delayed response status |
Error | FNB reported an error for the value |
Unknown | The returned value could not be interpreted |
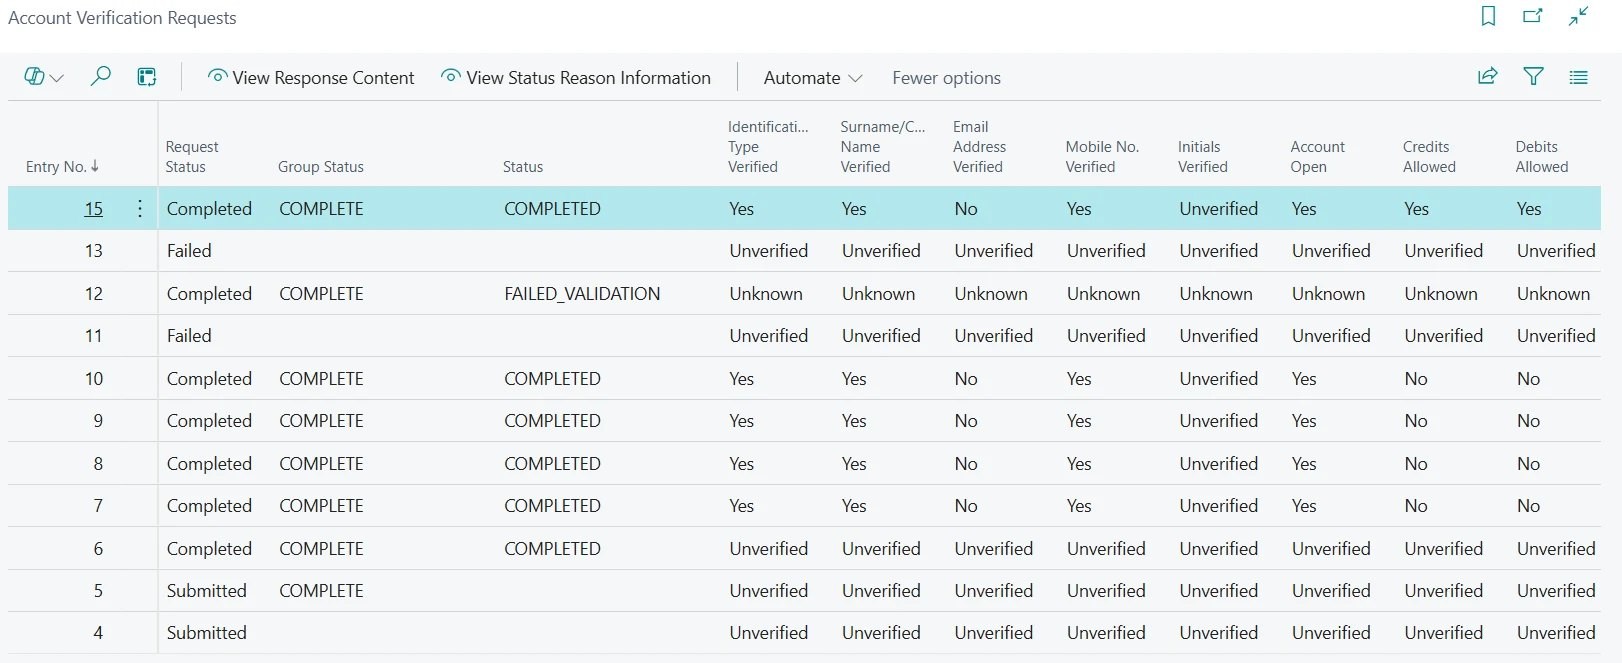
On the Account Verification Requests page:
Select
View Status Reason Information
to review reasons and additional information returned by FNB.
Select
View Response Content
to view the raw service response for troubleshooting.
Troubleshooting
If
Verify Account
reports a missing field, complete all required bank account and contact fields listed above.
If the Account Holder Contact cannot be selected, confirm that the contact is linked to the same customer or vendor through a Contact Business Relation.
If a request remains
Submitted
, check the Job Queue Entries page and confirm that the scheduled AVS retrieval entry can run.
If a request is
Failed
, review
Status Reason Information
and
Response Content
, correct the underlying data or connectivity issue, and submit a new verification request.
If no result email is received, review the AVS email scenario and email account setup. The result remains available from the bank account FactBox and Account Verification Requests page.
Need help with your environment?
Use your agreed Braintree support channel, or contact the team to confirm the right support route.
Contact Braintree
